


What is an MDI?
A Menu Directed Inspection (MDI) is an inspection template that you build on your computer and install to run on your Mentor video borescope systems. When the MDI is run during an inspection, it captures information in addition to capturing images. Instead of notebooks, or separate files, MDI allows you to annotate directly on an image you captured, provides a smart descriptive file name and a reference to the component within the asset being inspected. MDI can streamline the capture, storage, reporting, and sharing of high quality inspection data from the borescope.
Download the MDI Builder+ software program from the Waygate Technologies InspectionWorks Store.
Before Inspection
How to use MDI Builder+ Software
There are a number of ways to get started making an MDI.
- Use one of the four MDI templates included in the MDI Builder+ program
- Import an existing MDI, edit it, and save it with a new file name
- Build an MDI from scratch without using a prior MDI as a template
We recommend browsing InspectionWorks.com/Store for demonstration MDI templates. You can find templates from a wide variety of industries.
You can also reach out to your local sales representative or connect with us via Live Chat for assistance.

Use a Built-In Existing Template
A simple way to quickly build an MDI file is to modify one of the four built-in templates to meet your specific inspection requirements. MDI Builder+ software contains sample MDI files that are easily edited to create unique MDIs based on Turbine engines, Rockets, Internal Combustion engines, or Wind Turbines.
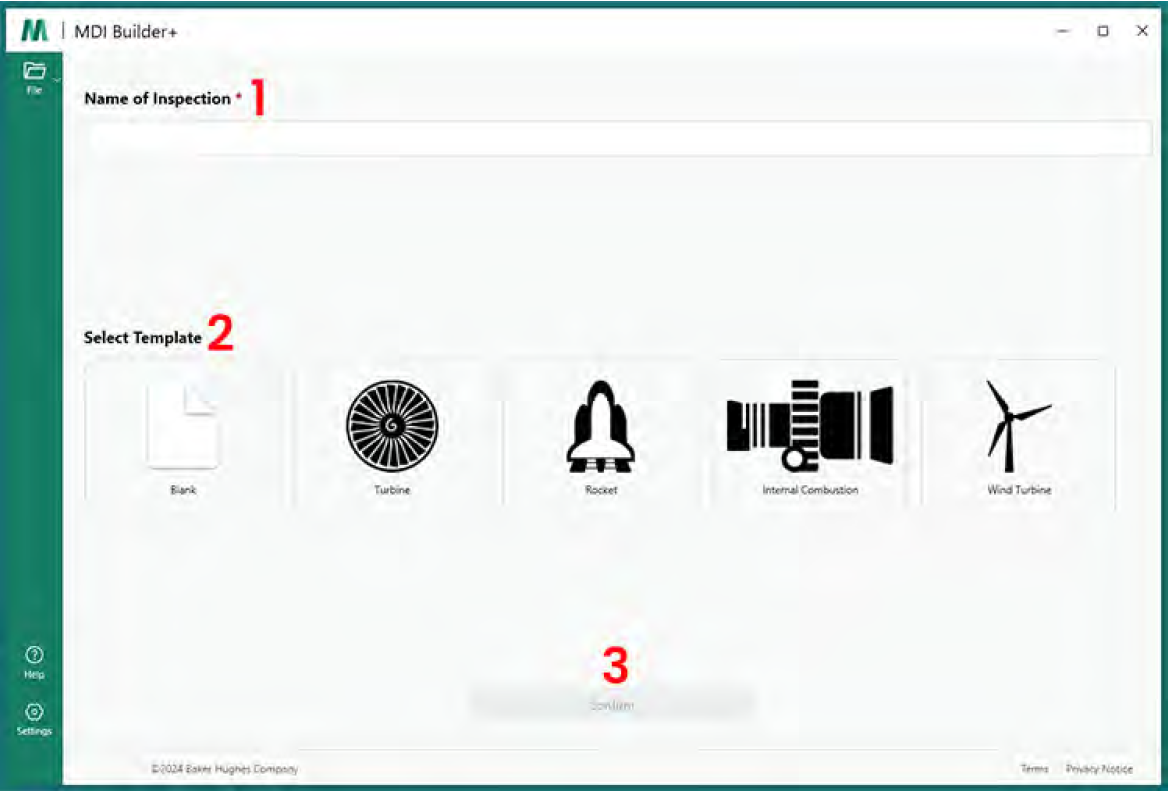
- Start by naming your MDI Inspection. The inspection name can contact up to 50 characters including upper and lower case alpha characters, numbers, and special keyboard characters. Spaces are not accepted.
- Select your desired template.
- Click the "Confirm" button.
Import an Existing MDI
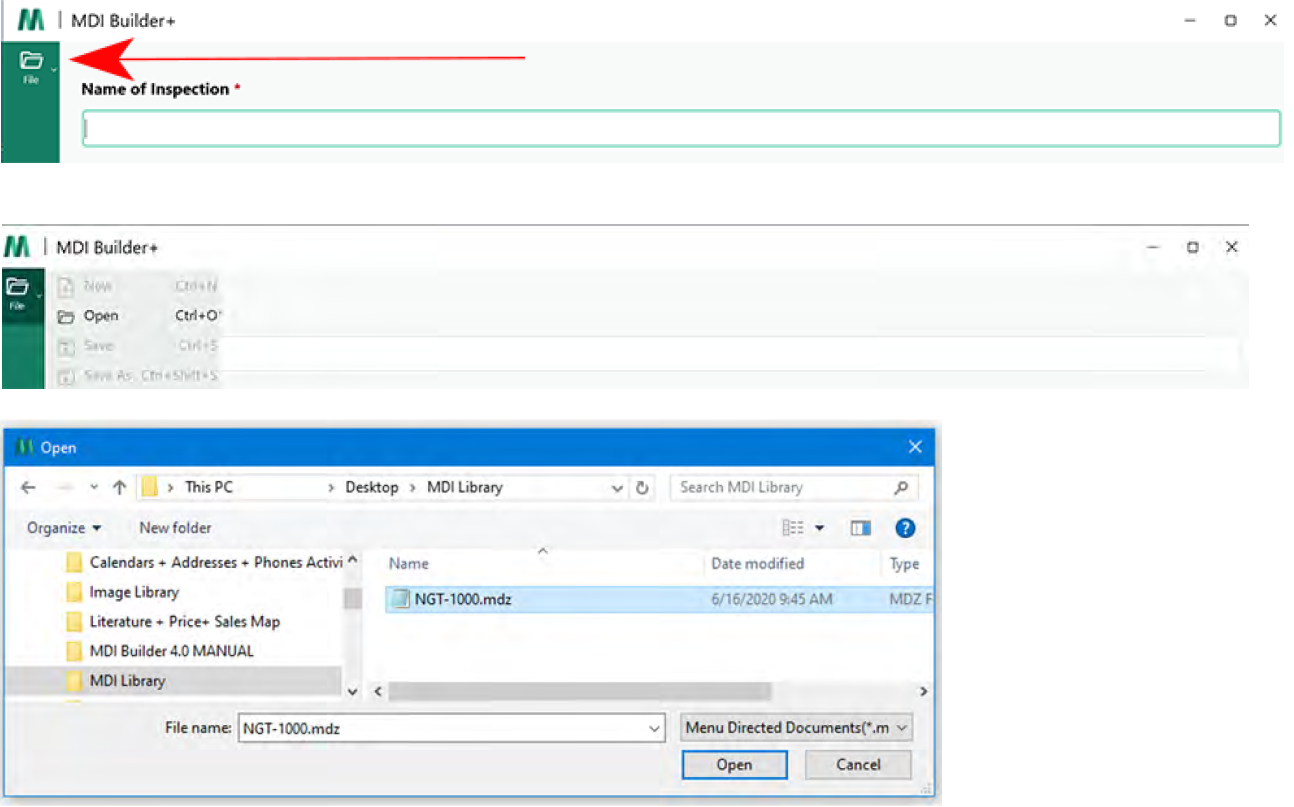
You can also create a new MDI template using an already existing MDI file. To open an existing MDI, click on the drop-down icon next to the file folder icon in the MDI Builder+ application.
Once the drop-down icon is clicked, you will see the "Open" option. Once you click "Open", a search window will open on your computer so you can browse for the existing MDI file. Click "Open" once you have found the file you would like to use.
Building an MDI from a Blank Template
To start building an MDI from a blank template:
- Name the MDI Inspection (refer to naming guidelines above)
- Select the Blank Template option in MDI Builder+
- Click "Confirm"

During Inspection
Getting Started with MDI Builder+ Template on your Borescope
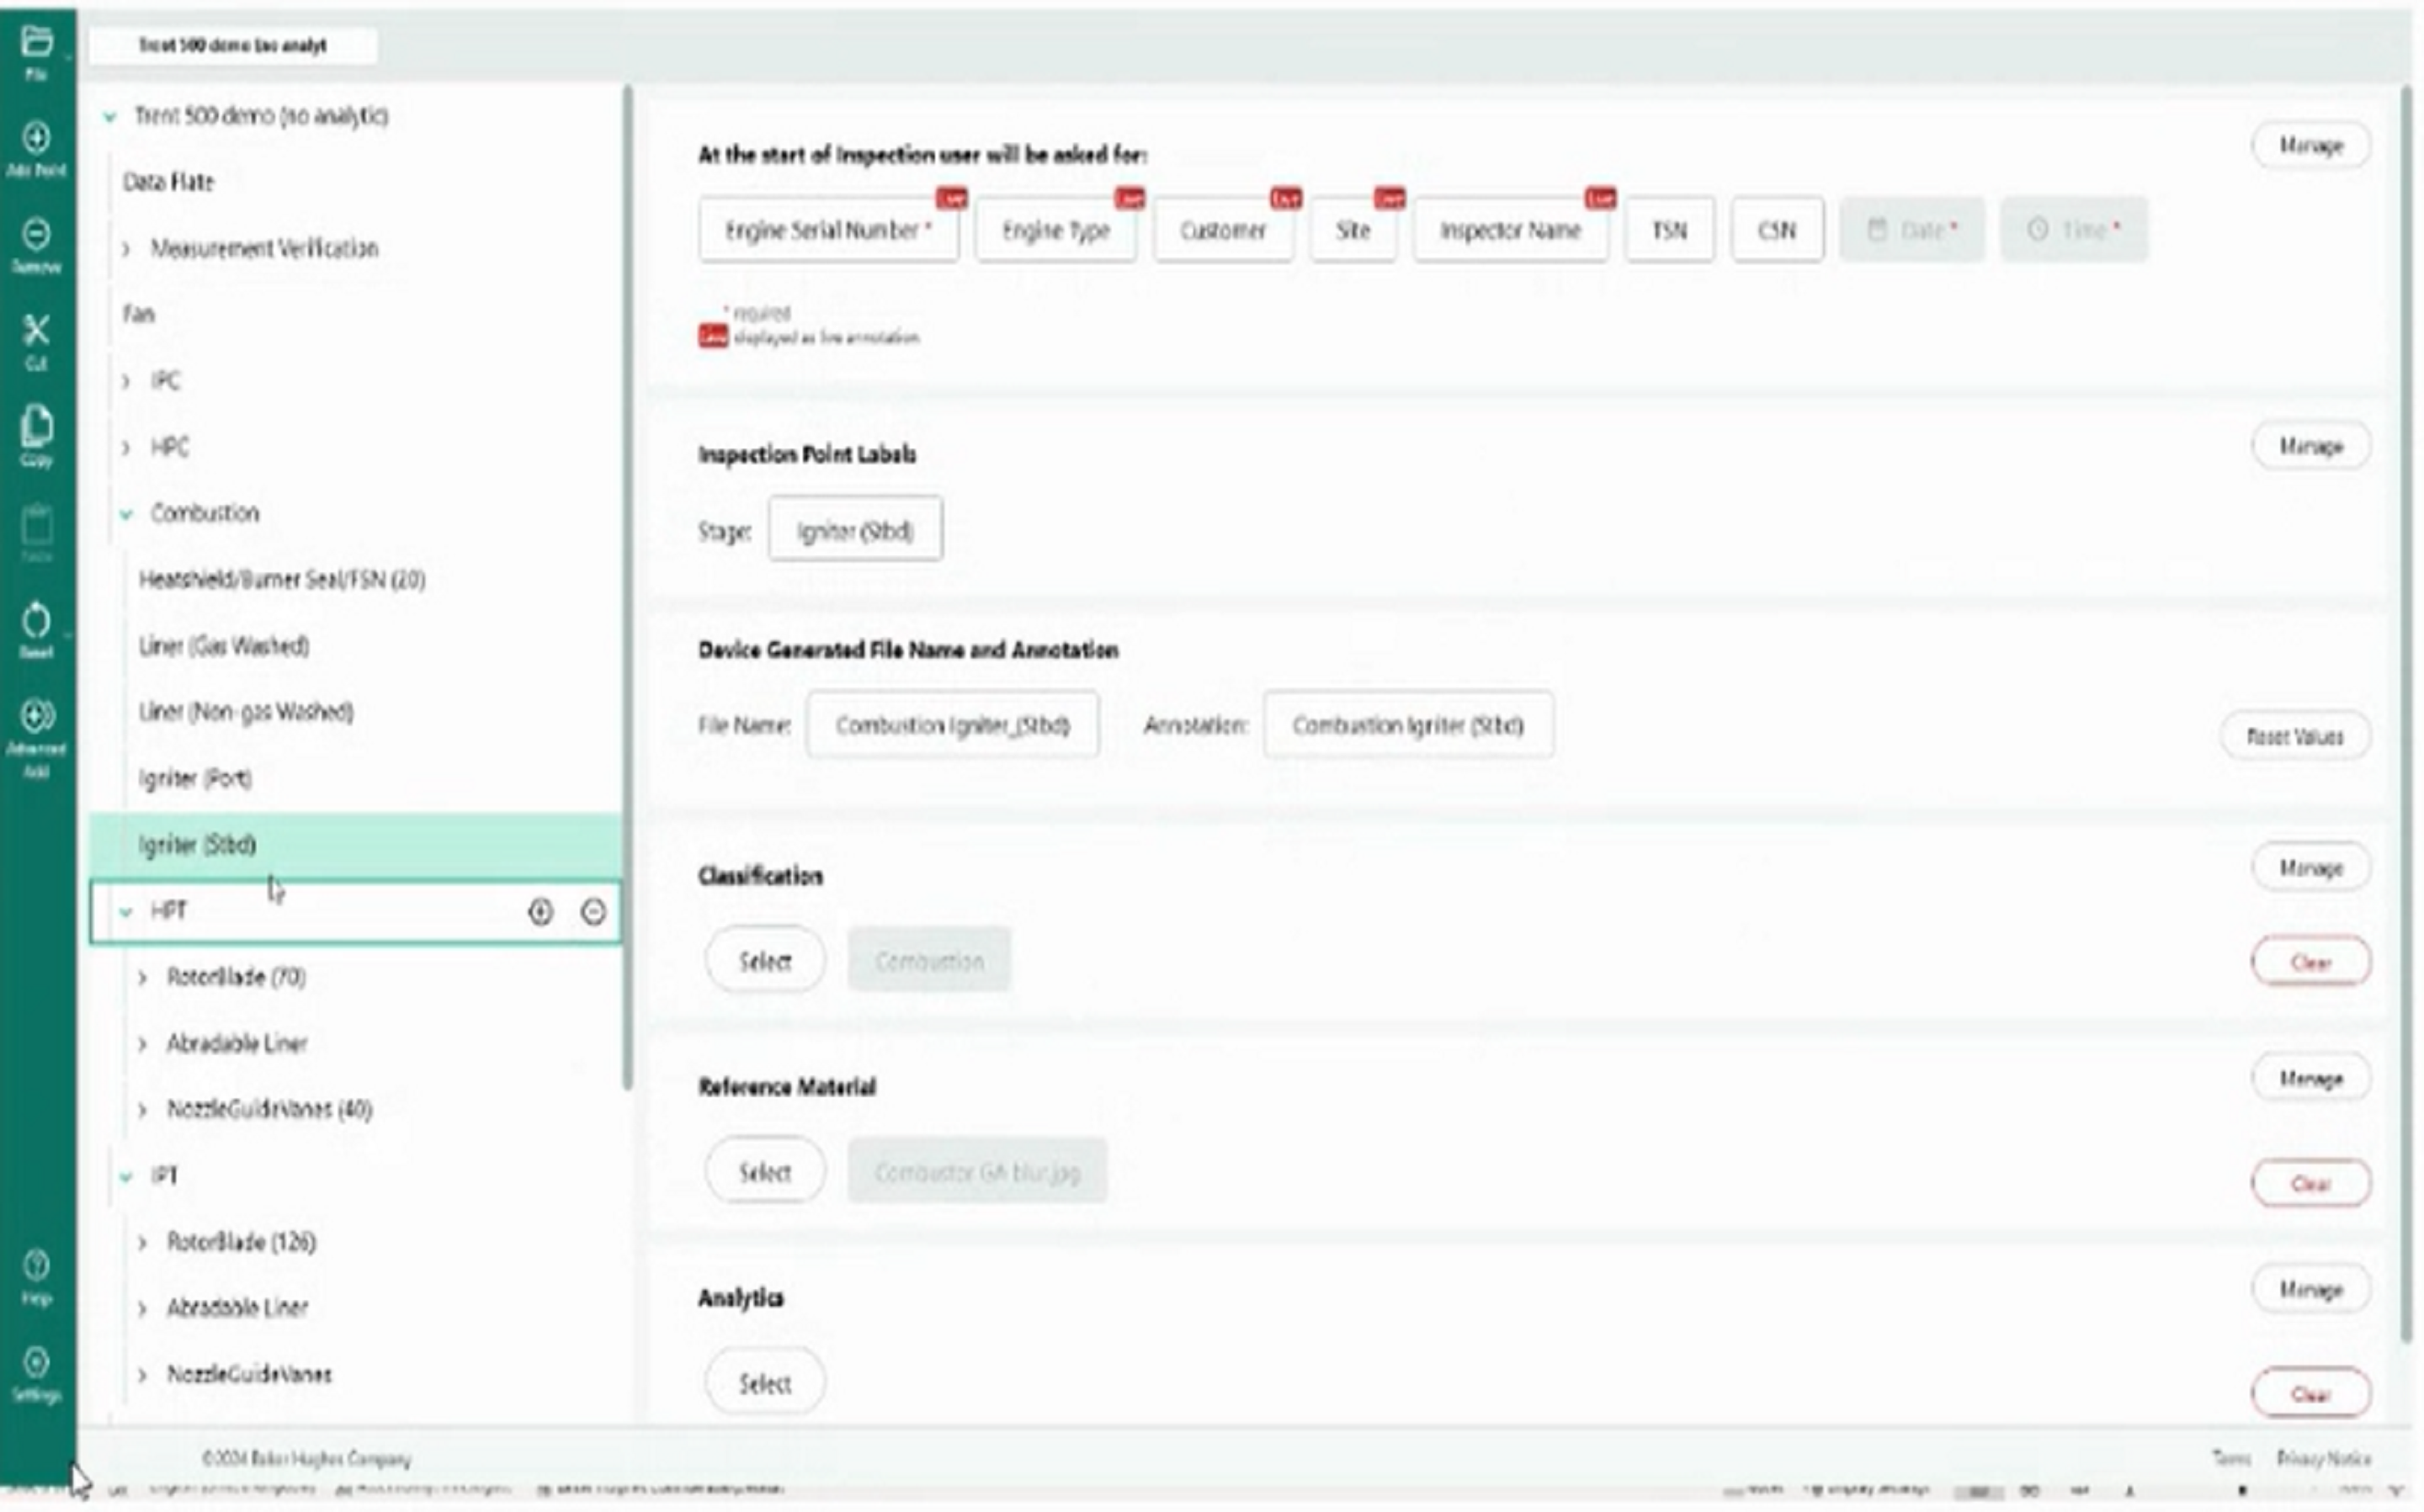
If at any point you need to go back to information you have already entered, you do so by touching the live text that is in the top left corner of your screen. This will bring up your inspection tree where you can navigate between different stages of your inspection to edit the information you previously entered.
Once you have completed your MDI template, you will be able to use it on your video borescope. Navigate to the MDI main menu on your borescope and select it. You are now able to see your inspection 'tree' or the information fields you wanted populated when you built your MDI template. This demo starts by taking a picture of the engine data plate, then moves through the measurement verification of the specific engine.
Take note of the folded over page icon next to the listed information which indicates whether you have collected reference material for that stage of your inspection. You can compare your live inspection with the reference material by putting the material on your screen while conducting your live inspections. Simply navigate to your Split Screen option on your video borescope and press the Reference Material button to bring up the reference material (in this case, an image document) on the right-hand side of your borescope screen. This helps you to show your customer, or team, who is reading your report where this particular type of defect was found during your inspection because you have live measurement on the left-hand side. Viewing reference material on the video borescope lets you review specific information that can help you through the process of enabling component sentencing.
To save an image to a specific stage of your inspection, simply navigate to that stage via the instructions above and select it to bring up the information on the screen of the image you are about to capture.
When saving an image, you can include additional information like defect classifications, comments, or audio to be attached to the image. This makes it easier to provide more details to whoever is reviewing your inspection.
Once you save the image, files are automatically renamed with smart intuitive logic. Additional metadata is simultaneously captured so that post-inspection analysis like report generation is effectively undertaken.
Learn more about voice activation on the Mentor Visual iQ+ video borescope here
After Inspection
Creating Reports on your Borescope
You can generate reports directly from your video borescope once you have completed your inspection. The images you saved to each inspection stage will be included in order with the details you saved to each image. The report will be generated as both Word and PDF documents.
See for Yourself
MDI Builder+ makes inspectors and technicians' lives easier. It creates inspection templates to meet industry requirements and collect all the necessary data in one go.
See how MDI Builder+ will save time and make your inspections more efficient.